

The VoIP landscape has shifted. With the deprecation of the legacy chan_sip driver, learning the modern Asterisk PJSIP trunk configuration is no longer optional—it is a necessity for any VoIP engineer or system administrator. While chan_pjsip offers superior performance and modularity, its configuration is significantly more complex than its predecessor.
This guide provides a copy-paste-friendly template to get your SIP trunk registered and routing calls immediately. While manual configuration grants you granular control, it also introduces maintenance overhead. For businesses seeking the power of Asterisk without the technical liability, we will also explore how managed platforms like HAPBX automate this complexity.
Prerequisites for PJSIP Trunk Setup
Before diving into the configuration files, ensure your environment is ready to avoid common “Endpoint Not Found” or authentication errors later.
- Asterisk Version: Ensure you are running Asterisk 16 or newer (Standard or Long Term Support versions).
- Module Loading: Verify that the res_pjsip module is loaded in your modules.conf.
- ITSP Credentials: Have your SIP provider’s details ready:
- Username (often a distinct trunk ID).
- Secret (SIP Password).
- Registrar/Host IP (e.g., sip.provider.com).
Understanding the PJSIP Object Structure
If you are migrating from chan_sip, the structure of an Asterisk PJSIP trunk might look fragmented. Unlike the old method where one “friend” or “peer” block handled everything, PJSIP breaks a connection down into four distinct objects.
Understanding these objects is the key to mastering Asterisk PJSIP trunk configuration:
- Transport: Defines how Asterisk communicates on the network (UDP/TCP/TLS, ports, and NAT settings). This is the foundation—without it, nothing works.
- Registration: Tells the ITSP (Internet Telephony Service Provider) where your server is located so they can send calls to you.
- Auth: Holds your outbound credentials (username and password).
- AOR (Address of Record): Defines the contact information and tells Asterisk how to reach the provider.
- Endpoint: The core profile that ties the Auth, AOR, and codecs together. It is the central nervous system of the trunk.
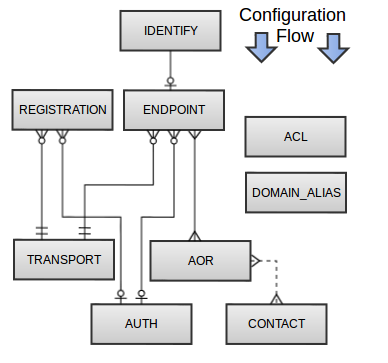
PJSIP Trunk Objects Relationship
Configuring pjsip.conf: The Code
Below is a standard template for a provider requiring registration (the most common scenario). You will need to edit /etc/asterisk/pjsip.conf.
Replace the placeholders (e.g., MY_TRUNK_NAME, PROVIDER_IP, YOUR_PASSWORD) with your specific data.
Step 1: Define Your Transport (Required)
Every PJSIP configuration must start with a transport definition. This tells Asterisk how to send and receive SIP traffic on the network. Without this section, your trunk will not function at all.
(code Ini)
; ==============================
; TRANSPORT CONFIGURATION
; (Must be defined FIRST!)
; ==============================
[transport-udp]
type=transport
protocol=udp
bind=0.0.0.0:5060
; Uncomment the lines below ONLY if your server is behind NAT:
;external_media_address=YOUR_PUBLIC_IP
;external_signaling_address=YOUR_PUBLIC_IP
;local_net=192.168.0.0/16
NAT Configuration Notes:
- external_media_address: Your public IP address (for RTP audio streams)
- external_signaling_address: Your public IP address (for SIP signaling)
- local_net: Your internal network range (e.g., 192.168.0.0/16 or 10.0.0.0/8)
Only uncomment these if your Asterisk server sits behind a router/firewall
Step 2: Configure Your Trunk Objects
Now that Asterisk knows how to communicate, define your trunk components:
(code Ini)
; ==============================
; 1. Registration Section
; ==============================
[MY_TRUNK_NAME_REG]
type=registration
outbound_auth=MY_TRUNK_NAME_AUTH
server_uri=sip:PROVIDER_IP
client_uri=sip:YOUR_USERNAME@PROVIDER_IP
retry_interval=60
; ==============================
; 2. Authentication Section
; ==============================
[MY_TRUNK_NAME_AUTH]
type=auth
auth_type=userpass
username=YOUR_USERNAME
password=YOUR_PASSWORD
; ==============================
; 3. Address of Record (AOR)
; ==============================
[MY_TRUNK_NAME_AOR]
type=aor
contact=sip:PROVIDER_IP:5060
; ==============================
; 4. Endpoint Section
; ==============================
[MY_TRUNK_NAME]
type=endpoint
context=from-provider-inbound ; Where inbound calls land in dialplan
disallow=all
allow=ulaw
allow=alaw
outbound_auth=MY_TRUNK_NAME_AUTH
aors=MY_TRUNK_NAME_AOR
from_user=YOUR_USERNAME ; Critical for many providers
from_domain=PROVIDER_IP ; Critical for authentication
direct_media=no
Important Codec Note: G.729 is a licensed codec in Asterisk. Unless you have purchased a commercial license, do not add it to your allow list or calls may fail with “No compatible codecs” errors. The configuration above uses ulaw and alaw, which are royalty-free and universally supported.
Key Configuration Parameters Explained
- context: This is crucial for security. It dictates where inbound calls from this trunk will enter your extensions.conf. Never use default or public unless you have strictly secured your Dialplan. Inbound contexts should never have direct access to outbound dialing without authentication.
- from_user & from_domain: Many providers will reject your calls (returning a 403 Forbidden) if the SIP header does not match their expectations. These settings force the header to match your provider’s domain rather than your local IP.
- disallow/allow: Always explicitly define your codecs. ulaw and alaw are standard for high-quality voice.
- direct_media=no: Forces RTP (audio) traffic through your Asterisk server. This is essential for NAT traversal and call recording but increases server bandwidth usage.
Dialplan Integration (extensions.conf)
A configured trunk is useless if Asterisk doesn’t know how to route calls through it. You must configure extensions.conf to handle both outbound and inbound traffic.
Outbound Routing
To make a call, use the PJSIP channel driver syntax: PJSIP/destination@endpoint.
(code Ini)
[outbound-calls]
exten => _X.,1,NoOp(Making outbound call via PJSIP Trunk)
same => n,Dial(PJSIP/${EXTEN}@MY_TRUNK_NAME,30)
same => n,Hangup()
Note: The pattern _X. matches any number starting with a digit. For production systems, use more specific patterns like _NXXNXXXXXX for US numbers to prevent misrouting.
Inbound Call Handling
In the pjsip.conf Endpoint section above, we set context=from-provider-inbound. We must create that context here to receive calls.
(code Ini)
[from–provider–inbound]
exten => _X.,1,NoOp(Incoming call from SIP Provider)
same => n,Dial(PJSIP/100) ; Ring extension 100
same => n,Hangup()
Troubleshooting Common PJSIP Errors
Even with a perfect configuration template, network variables can cause issues. Here is how to troubleshoot your Asterisk PJSIP trunk.
Essential CLI Commands
Access the Asterisk CLI (asterisk -rvvv) and use these commands:
- pjsip show endpoints: Checks the status of your trunk. You want to see “Available” or “Not in use” (which means registered and ready). If it says “Unavailable,” check your AOR.
- pjsip show registrations: Confirms if the provider accepted your registration.
- pjsip set logger on: The ultimate debugging tool. It shows the raw SIP packets. Look for “401 Unauthorized” (bad password) or “408 Request Timeout” (firewall issue).
NAT and Firewall Issues
If your registration times out, it is often a NAT (Network Address Translation) issue. Ensure your server firewall allows traffic on UDP port 5060 (or your customized bind port) and the RTP port range (usually 10000-20000).
You may need to configure the external_media_address, external_signaling_address, and local_net parameters in your [transport-udp] section if your server is behind a router.
The Hidden Costs of Manual PBX Management
Configuring pjsip.conf is just the beginning. The real challenge of a DIY Asterisk server lies in “Day 2” operations. A self-hosted system—whether on a physical server or a single VPS—represents a Single Point of Failure. If the hardware fails, the drive corrupts, or an OS update breaks the res_pjsip module, your entire business communication goes silent.
Moreover, you bear the sole responsibility for security. Without constant patching against toll fraud and DDoS attacks, your “free” open-source software can quickly become an expensive liability.
HAPBX: The High-Availability Alternative
If the complexity of the configuration above feels risky for your business continuity, there is a professional alternative.
HAPBX (High Available Private Branch Exchange) is an enterprise-grade solution built on a Dedicated Instance architecture. Unlike shared cloud PBX solutions, HAPBX offers:
- Global Cluster Infrastructure: We eliminate the Single Point of Failure. Your PJSIP trunks and extensions run on a high-availability cluster designed for continuous uptime, keeping your business connected even if a node fails.
- Zero-Touch Maintenance: Forget about editing configuration files or debugging SIP headers. HAPBX manages the infrastructure, security hardening, and updates entirely.
- Unlimited Scalability: Whether you have 10 users or 1000+, HAPBX scales instantly. You get unlimited extensions and concurrent calls without needing complex hardware upgrades.
- Low Latency Performance: With servers optimized for VoIP, we maintain ping times around 50ms, ensuring crystal-clear voice quality that DIY setups often struggle to achieve.

HAPBX The High-Availability Advantage
Conclusion
Migrating to chan_pjsip ensures your VoIP system is future-proof and capable of handling modern communication standards. By following the Asterisk PJSIP trunk configuration steps above—defining your Registration, Auth, AOR, and Endpoint—you can establish a robust connection with your ITSP.
However, for organizations where uptime is non-negotiable, relying on a single, manually configured server carries inherent risks.
If you prefer to focus on business growth rather than debugging SIP headers, consider HAPBX as your secure, high-availability communication partner. Check HAPBX pricing or start a free trial now!