

The Raspberry Pi has revolutionized the world of home labs, offering a compact, energy-efficient computing platform for everything from media centers to ad blockers. But for communication enthusiasts, its most compelling use case is transforming this credit-card-sized computer into a fully functional PBX (Private Branch Exchange).
Combining the Raspberry Pi with Asterisk and the modern PJSIP channel driver creates a powerful, low-latency VoIP server that costs pennies a month to run.
While the legacy chan_sip driver was lightweight and forgiving, it is now deprecated. PJSIP is the future standard—offering better security, modularity, and IPv6 support. However, running a modern SIP stack on ARM architecture requires specific steps to ensure stability and performance.
This guide provides a comprehensive walkthrough for installing, compiling, and optimizing PJSIP on a Raspberry Pi (Models 3, 4, and 5), helping you build a DIY communication hub that punches well above its weight class.
Why PJSIP and Raspberry Pi are a Perfect Match?
At first glance, the heavier architecture of PJSIP might seem ill-suited for a low-power device like the Raspberry Pi. In reality, the opposite is true.
PJSIP is modular by design. Unlike the monolithic chan_sip which loaded everything into memory at once, PJSIP allows you to load only the specific modules you need. On a device with limited RAM (like the 1GB or 2GB variants of the Pi), this granular control is invaluable. You can run a lean, efficient SIP stack without the bloat.
Hardware Considerations:
While you can run this setup on a Raspberry Pi 3B+, we strongly recommend a Raspberry Pi 4 or 5.
- Gigabit Ethernet: VoIP is sensitive to jitter. The Gigabit port on newer models (separated from the USB bus) ensures smooth audio transport.
- CPU Crypto Extensions: SIP signaling over TLS (Encrypted VoIP) requires CPU power. The newer ARM Cortex cores handle encryption significantly faster, preventing lag during call setup.
- Thermal Management: PJSIP is efficient, but compiling it puts a heavy load on the CPU. A passive heatsink or active fan case is recommended to prevent thermal throttling during installation.
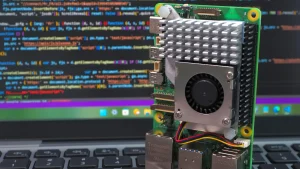
PJSIP Raspberry Pi
Preparing the Pi: OS and Dependencies
To get the most out of your hardware, do not install the desktop version of the OS. A GUI wastes precious CPU cycles and RAM that should be dedicated to call processing.
1. Operating System Choice
Flash your SD card with Raspberry Pi OS Lite (64-bit). The 64-bit version is preferred for newer Asterisk versions and allows for better memory addressing if you are using a Pi with 4GB or 8GB of RAM.
2. Network Configuration
Never run a VoIP server over Wi-Fi. Packet loss and latency fluctuations will destroy call quality. Connect your Pi via Ethernet and assign a Static IP address in your router or via dhcpcd.conf to ensure your phones can always find the server.
3. Install Build Dependencies
Before we can compile PJSIP, we need to equip the Pi with the necessary development tools. The “Lite” OS comes stripped down, so we must install the libraries required to build software from source.
Run the following commands to update your repository and install the dependencies:
codeBash
sudo apt-get update && sudo apt-get upgrade -y
sudo apt-get install -y build-essential git wget libssl-dev libncurses5-dev \
libnewt-dev libxml2-dev kernel-headers-$(uname -r) libsqlite3-dev uuid-dev \
libjansson-dev
- libssl-dev: Critical for encrypted SIP (TLS) and WebRTC.
- libjansson-dev: Required for PJSIP to handle JSON data (essential for modern Asterisk functionality).
- uuid-dev: Needed for generating unique IDs for SIP headers.
The Core Guide: Compiling Asterisk with Bundled PJSIP on ARM
Many older guides suggest compiling the standalone pjproject library first, then compiling Asterisk. On ARM architecture (Raspberry Pi), this often leads to version mismatches and linking errors.
The safest, most reliable method for PJSIP Raspberry Pi installations is to use the Bundled PJPROJECT option included directly in the Asterisk source code. This ensures perfect compatibility between the PBX core and the SIP stack.
Step 1: Download Asterisk Source
Navigate to the source directory and download the latest version of Asterisk (we recommend using a Long Term Support version like Asterisk 20 for stability on the Pi).
codeBash
cd /usr/src
sudo wget https://downloads.asterisk.org/pub/telephony/asterisk/asterisk-20-current.tar.gz
sudo tar zxvf asterisk-20-current.tar.gz
cd asterisk-20.*
Step 2: Configure for ARM Architecture
This is the critical step. We must tell the build system to download the compatible PJSIP source code and bundle it into the final binary.
First, install the prerequisites script provided by Asterisk to catch any missing dependencies:
codeBash
sudo contrib/scripts/install_prereq install
Next, run the configuration script with the bundled option:
codeBash
sudo ./configure —with-pjproject-bundled
Watch the output closely. You are looking for a massive ASCII art asterisk logo at the end. If it fails, check the error log—usually, it is a missing library like libxml2-dev.
Step 3: Menu Select
Before compiling, you need to verify that res_pjsip is selected.
codeBash
sudo make menuselect
- Use arrow keys to navigate to Resource Modules.
- Ensure res_pjsip and its related modules (like res_pjsip_session, res_pjsip_authenticator_digest) have [*] next to them.
- Pro Tip: While here, go to Core Sound Packages and select the sound files you want (e.g., CORE-SOUNDS-EN-WAV).
- Press x to save and exit.
Step 4: Compilation and Installation
Now, we turn the source code into a running program.
Warning: On a Raspberry Pi 3 or 4, this step can take anywhere from 20 to 45 minutes. Be patient and ensure your Pi has a good power supply (compilation draws peak power).
codeBash
sudo make
sudo make install
sudo make samples
sudo make config
sudo ldconfig
- make: Compiles the code.
- make install: Copies binaries to the system folders.
- make samples: Generates sample config files (including pjsip.conf) in /etc/asterisk.
- make config: Installs the initialization scripts so Asterisk starts on boot.
Once completed, you can start your new VoIP engine:
codeBash
sudo systemctl start asterisk
sudo asterisk –rvvv
If you see the Asterisk CLI prompt, congratulations! You successfully have a PJSIP-powered PBX running on a Raspberry Pi.
Performance Tuning: Optimizing PJSIP for Limited Hardware
Now that your Asterisk server is running, the challenge shifts from installation to optimization. A Raspberry Pi is powerful, but it is not a Xeon server. The default PJSIP settings are often too aggressive for the Pi’s SD card I/O and CPU capabilities.
1. Avoid Transcoding at All Costs
Transcoding (converting audio from one format to another, e.g., G.729 to G.711) is mathematically intensive. While a standard server handles this easily, a Raspberry Pi will struggle with more than 1 or 2 simultaneous transcoded calls, leading to robotic voice quality.
The Fix: Force “Pass-through” mode.
In your pjsip.conf endpoints, ensure your codecs match exactly between the phone and the trunk provider.
codeIni
[my_endpoint]
disallow=all
allow=ulaw,alaw ; Standard uncompressed codecs (G.711)
By matching codecs, the Pi simply passes the data packets from A to B without touching the audio payload, allowing it to handle 10+ concurrent calls easily.
2. Save Your SD Card: Manage Logging
The Achilles’ heel of the Raspberry Pi is the microSD card. PJSIP can be incredibly verbose, writing megabytes of logs per minute during troubleshooting. Constant writing will burn out your SD card’s flash memory cells in a matter of months.
The Fix:
- Edit /etc/asterisk/logger.conf and comment out the full log or reduce the verbosity unless you are actively debugging.
- Advanced: Mount your /var/log/asterisk directory to a RAM disk (tmpfs). This writes logs to the Pi’s RAM instead of the SD card. They will be lost on reboot, but your SD card will last years instead of months.
3. Memory Management
If you are using a Raspberry Pi with 1GB or 2GB of RAM, every megabyte counts.
- Limit max_contacts in your PJSIP AOR (Address of Record) sections to only what is necessary (usually 1 for a desk phone).
- Disable unused Asterisk modules in modules.conf (like res_calendar or cel_sqlite3) to free up memory for PJSIP processing.
Alternative Method: Using RasPBX (Quick Overview)
If the command line compilation process above feels too daunting, there is an easier path: RasPBX.
RasPBX is a pre-built image based on Raspberry Pi OS that comes with FreePBX and Asterisk pre-installed. It provides a graphical web interface to manage your extensions and trunks.
- Pros: Easy to set up; no compilation needed; visual dialplan builder.
- Cons: It is significantly heavier. The Apache web server, PHP, and MySQL database required by FreePBX consume a large portion of the Pi’s resources, leaving less room for actual call processing.
While RasPBX is excellent for beginners, the “bare metal” PJSIP installation described earlier is far superior for stability and performance on ARM hardware.
The Reality of “Production” on a Raspberry Pi
Successfully building a PJSIP Raspberry Pi server is a rite of passage for any VoIP enthusiast. It works beautifully for a home intercom, a hobby line, or a very small home office.
However, moving this setup into a business production environment carries significant risks:
- SD Card Corruption: This is not a matter of if, but when. A power outage during a database write can corrupt the file system, taking your phone system offline indefinitely.
- Lack of Redundancy: A Raspberry Pi is a single point of failure. It has no RAID for data protection and no redundant power supplies.
- Network limitations: Running a business PBX on a consumer-grade home internet connection (often with dynamic IPs) introduces NAT issues and jitter that annoy clients.
Great for hobbyists, risky for business.
HAPBX: The “Grown-Up” Alternative to Raspberry Pi
If you are reading this because you need a cost-effective, reliable phone system for your business, the Raspberry Pi might be a false economy. The hours spent compiling code, managing SD cards, and troubleshooting NAT issues often cost more than a professional service.
HAPBX (High Available Private Branch Exchange) offers the professional upgrade path.
- Hardware Independence: Instead of relying on a $50 computer, your PBX runs on our Global Cluster Infrastructure.
- Dedicated Instance: Like your Pi, you get your own isolated environment (Asterisk/PJSIP), but it runs on enterprise-grade servers with redundant power, cooling, and storage.
- Managed Stability: We handle the OS updates, security patches, and PJSIP configurations. You get the flexibility of Asterisk without the hardware anxiety.
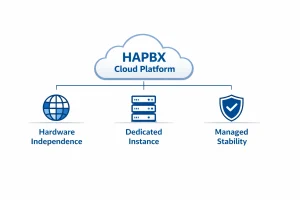
HAPBX’s three core advantages over DIY solutions
Conclusion
Running PJSIP on a Raspberry Pi is a testament to the power of open-source software and modern ARM hardware. By compiling from source and optimizing your configuration, you can build a surprisingly capable little server.
But when reliability is paramount—when a missed call means a lost customer—it is time to graduate from the Raspberry Pi. Consider HAPBX for a secure, high-availability communication platform that lets you focus on your calls, not your compilation errors. Contact HAPBX today!